What Do You Need to Know About Azure Virtual Networks?

So, you're ready to lift and shift your on-premises Virtual Machines (VMs) to Azure, but rather than using any default or pre-canned network settings, you need to create your own Azure Virtual Networks. But how?
In this tutorial, you'll learn how to create Azure Virtual Networks using three different ways, as well as getting a thorough walk-thru of how and why you'll do it.
So what are you waiting for? Let's dive in!
Prerequisites
This is a step-by-step tutorial, and if you plan to follow along, you'll need the following prerequisites in place:
- An Azure subscription – If you don't already have one you can register for a free Azure Account.
- An Azure user account – The user account must have at least a Contributor Role permission to the Azure subscription. This role enables you to create and delete resource groups and move resources between resource groups.
What are Azure Virtual Networks?
Azure Virtual Networks (vNet) are the core building blocks for all connectivity within your Azure private cloud. vNets allow for secure connectivity between VMs, the internet, and if connected properly, your on-premises networks.
You can think of a vNet in the same way as a standard on-premises network, but with the added benefit of being cost-effective, infinitely more scalable, and extremely secure to boot.
The core component of a vNet is its Address Space. You can have several Address Spaces within your vNet, but they cannot overlap with each other, and it's recommended practice not to have them overlap with any other networks that you intend on using elsewhere in your environment.
What Is An Address Space in Azure?
A vNet is broken down into two main components, an Address Space and a Subnet. The Address Space is the large over-arching network segment that is allocated to the network. This can be as simple as allocating a /16 network to the Azure region in many environments.
An Address Space is the overall range of addresses that is in use; for example, it’s a network of 10.0.0.0/16
Once you have your vNet and Address Space set up you are then able to consider connecting the network with others within your environment, or, more interestingly, outside of your environment.
What Are Subnets in Azure?
If an Address Space is the large IP address range assigned to the network, the subnet is a smaller, more targeted range of IP addresses within that larger range.
You can add multiple subnets to a vNet so long as the subnet range is fully contained within the larger vNet address space. A subnet allows for network and workload segmentation and can be seen as a simplification so that the network design makes sense. Subnets can also act as a security boundary to restrict network traffic between subnets and vNets using Network Security Groups (NSGs).
Related: What is an Network Security Group and Why Would You Want One?
A subnet is exactly what you’d imagine. It is a subset of that vNet. Typically these are broken down into manageable/usable networks, such as 10.0.1.1/24 and 10.0.2.1/24.
Is a Subnet In Azure Different To A Subnet On-Premises?
The main difference that you'll notice when creating your new subnet is that there are missing IP addresses from your range.
Using a traditional on-premises network you always lose the first and last IP address in the network range. For example, 192.168.0.1 and 192.168.0.255, if you're using a /24 network.
In Azure networking, you lose another three addresses in addition to the standard ones, bringing you to a total of five.
- x.x.x.0: Network address
- x.x.x.1: Reserved by Azure for the default gateway
- x.x.x.2, x.x.x.3: Reserved by Azure to map the Azure DNS IPs to the VNet space
- x.x.x.255: Network broadcast address
So for every /24 network, instead of 254 available IP addresses, you only get 251 addresses to use.
What size vNets are valid in Azure?
The smallest network that you can create within an Azure vNet is /29 and the largest is /8, and everything in-between is valid....
| Addresses | Number of Addresses | Number of Azure Addresses |
|---|---|---|
| /29 | 8 | 3 |
| /28 | 16 | 11 |
| /27 | 32 | 27 |
| /26 | 64 | 59 |
| /25 | 128 | 123 |
| /24 | 256 | 251 |
| /23 | 512 | 507 |
| /22 | 1024 | 1019 |
| /21 | 2048 | 2043 |
| /20 | 4096 | 4091 |
| /19 | 8192 | 8187 |
| /18 | 16384 | 16379 |
| /17 | 32768 | 32763 |
| /16 | 65536 | 65531 |
| /15 | 131072 | 131067 |
| /14 | 262144 | 262139 |
| /13 | 524288 | 524283 |
| /12 | 1048576 | 1048571 |
| /11 | 2097152 | 2097147 |
| /10 | 4194304 | 4194299 |
| /09 | 8388608 | 8388603 |
| /08 | 16777216 | 16777211 |
Setting up your Azure Virtual Networks
Using the Graphical User Interface (GUI)
The GUI is the general go-to tool for administrators when you have a task that you only need to do once or extremely infrequently. A common mantra is, "Do something once then open the GUI, Do something twice, code it out."
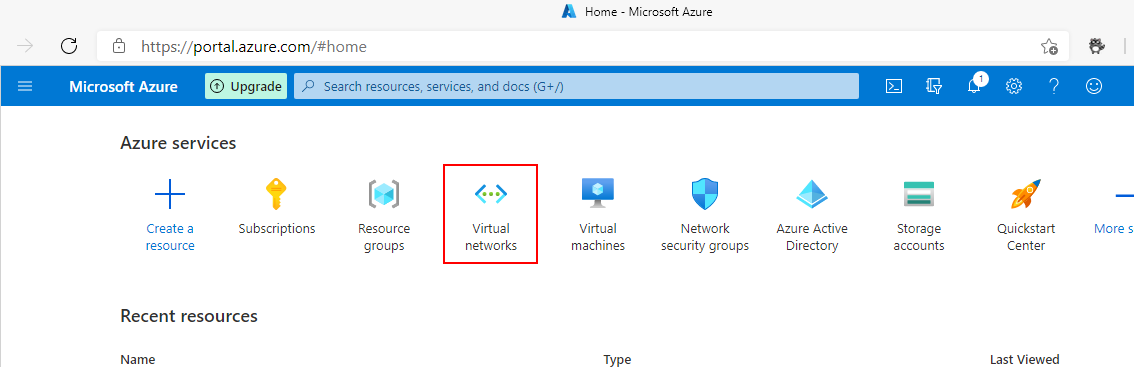
- Open your web browser and navigate to the Azure Portal. Either search for or click, Virtual Networks to open the Virtual Networks dashboard.
- Click Create to start the process of creating a new Virtual Network.

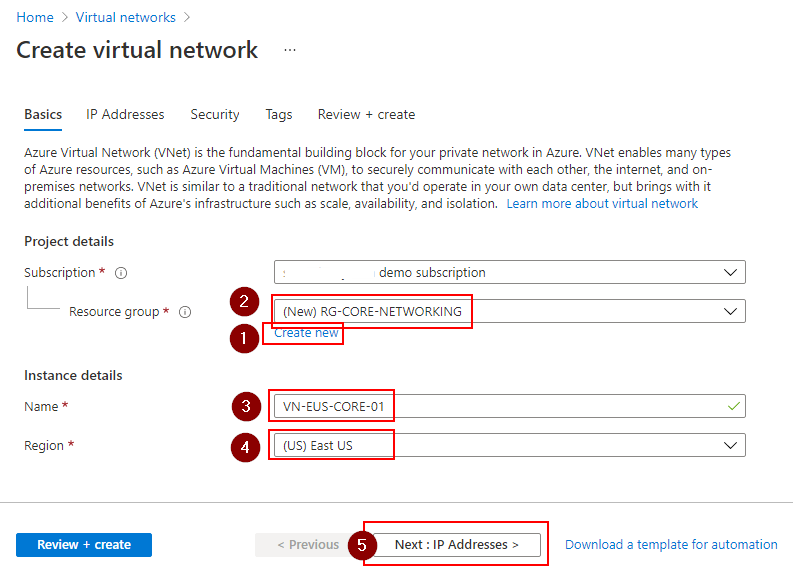
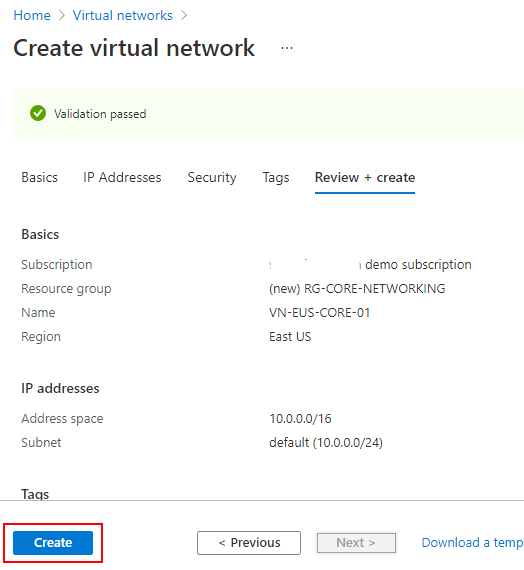
- On the first screen, titled Basics, click Create Now to create a Resource Group to hold your network resources. Your RG name should be RG-CORE-NETWORKING.
Enter VN-EUS-CORE-01 as your network name and choose East US as your Region.
Click Next : IP Addresses to continue.
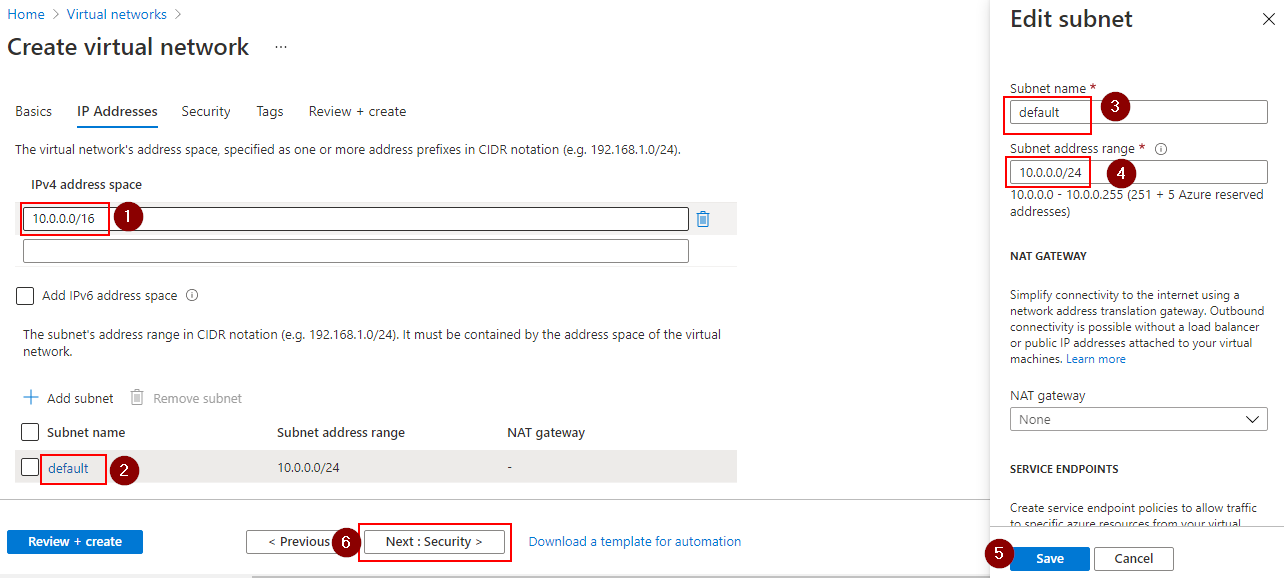
- Enter 10.0.0.0/16 as your address space, and click on the defaul subnetname of Default. This opens the Edit subnet blade. Update the subnet name to something relevant and alter the subnet address range here also.
Click Save when complete, and then click Next : Security to continue.
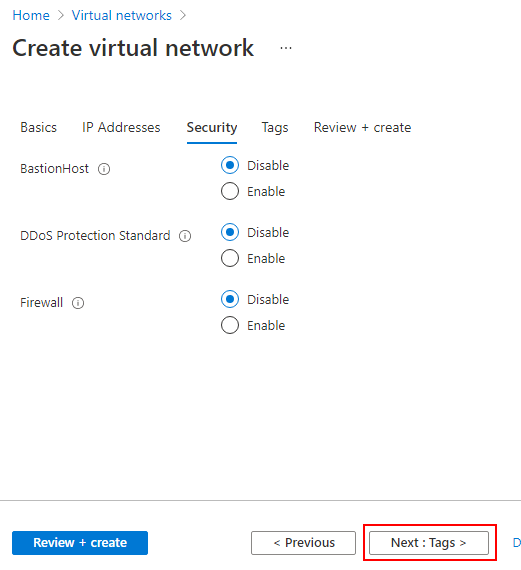
- The Security blade is where you specify whether you have a BastionHost or a Firewall and whether you'd like DDoS protection on the vNet. Leave the options at their default setting and click Next : Tags to continue.
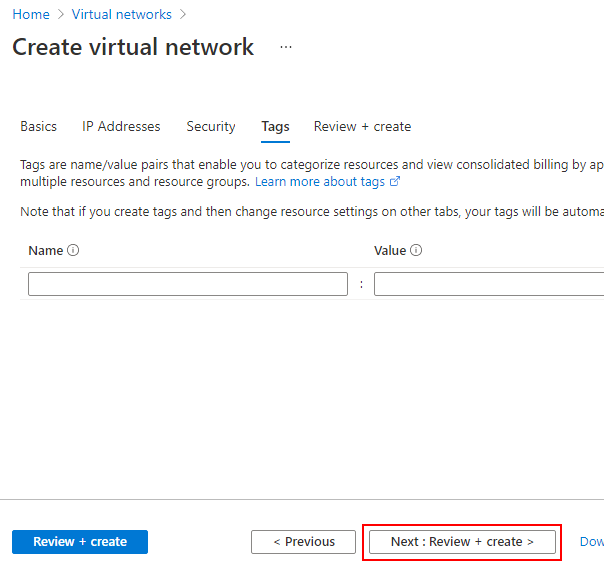
- The Tags blade is where you specify taxonomic tags to your resources. For this tutorial, leave the values empty, and click Next: Review + create > to continue to the review screen.
- Review the details of the vNet that you've just configured. Click Create to start the process of creating the vNet.
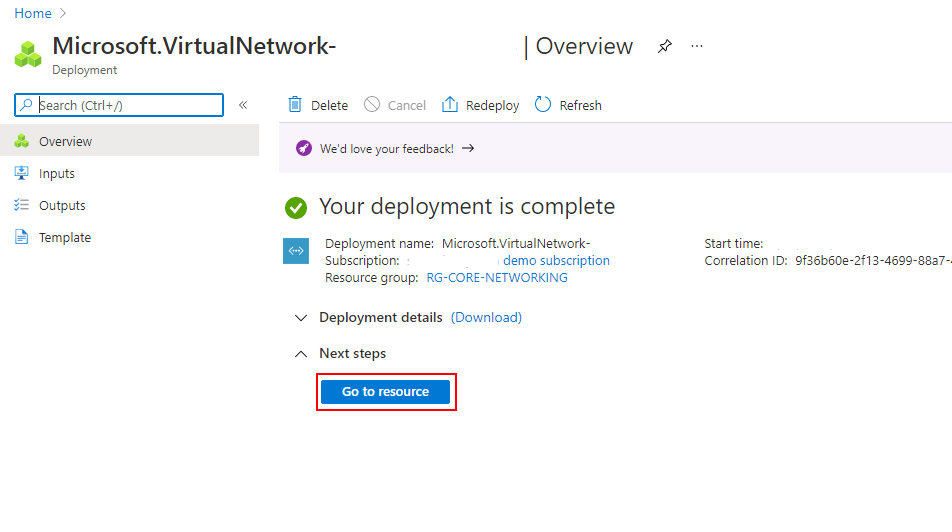
- Once the deployment has completed you'll see the below screenshot. Click Go to resource to shortcut opening your net vNet.
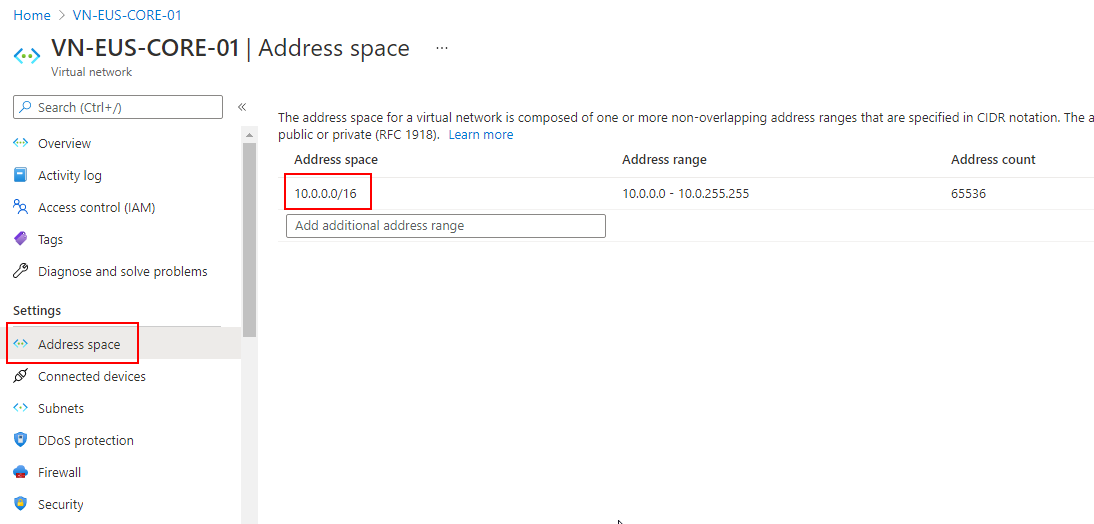
- Click on Address Space within the first blade and confirm that the network size is exactly as you are expecting. In this example you have created a /16 network which contains 65536 addresses in total.
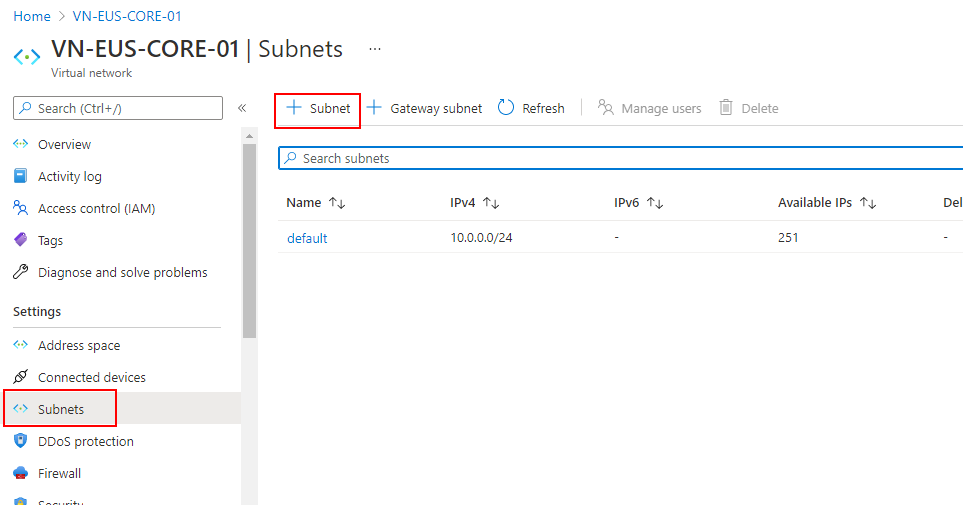
- Now, click into Subnets from the first blade, and review the default subnet that you have created. Your subnet is named default and it is a /24 network containing 251 available IP addresses.
Click the + Subnets button to add a new subnet.
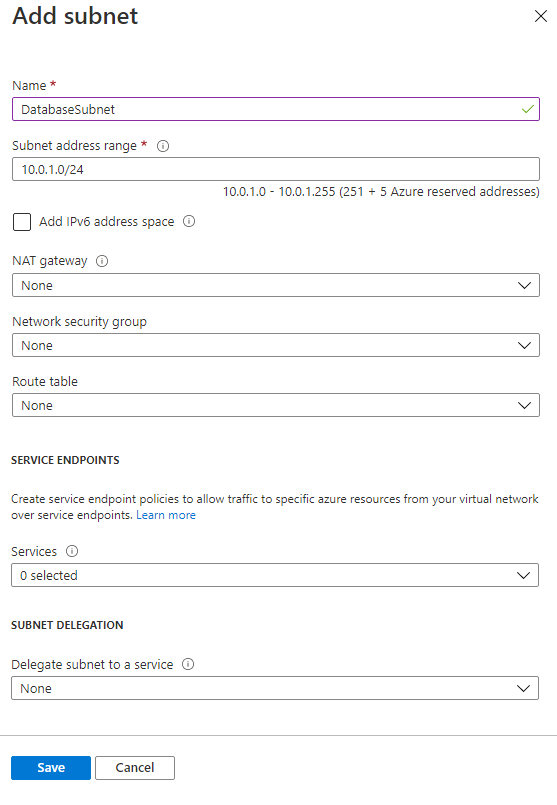
Within the new Add subnet blade enter the name DatabaseSubnet and select a new and unused range of 10.0.1.0/24 to create a new subnet for a few back-end database servers that you may have.
Lease the rest of the values as their default values as we're not setting up a NAT Gateway, a Network Security Group, or a Route Table.
Click Save to complete this screen and return to the main portal.
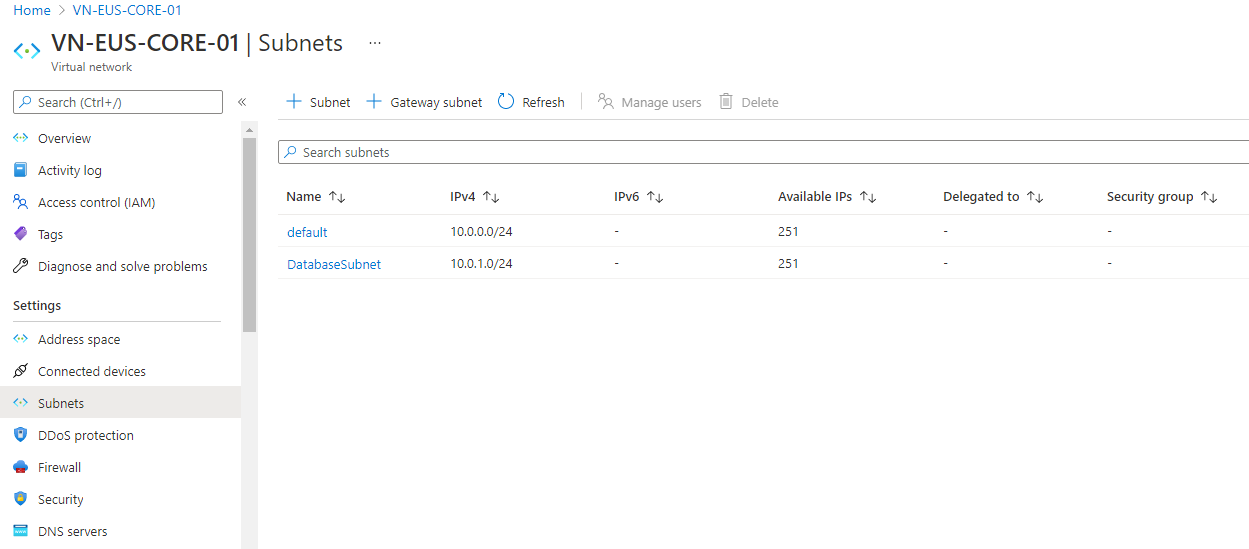
Review the new subnet and verify it's configured as you'd expect.
Conclusion
Azure Virtual Networks can seem daunting at first, but you can become a networking legend with some simple background knowledge. Start by using a logical size for your Address Space and then break your Subnets down into smaller, more manageable chunks that’ll serve individual purposes.
This approach to planning will help boost your security posture by only using what you need, but it’ll also help you plan the addresses you’ll use across the environment.
Armed with this new knowledge, will you ever look at your existing networks in the way same again?